"How to Make Korker Hairbows!"
Please give me credit with a link back. I'd also like to see your completed hairbows!

Materials Needed:
*Oven-Make sure its clean especially the top!
*100% Polyester Ribbon-Grosgrain works best
*1/4 inch wooden dowel-U can use a smaller or larger dowel thats just what I use.
If u want to make alot get a couple dowels. U need to cut them down so they will fit in your oven.
*Wooden Clothes pins (mini style work too)-Do NOT use plastic these are going in the oven!!
If u want to make alot get a couple dowels. U need to cut them down so they will fit in your oven.
*Wooden Clothes pins (mini style work too)-Do NOT use plastic these are going in the oven!!
*Reynolds Wrap
*Sissors
*Ruler or Measuring tape
*Frey Chek-on the notions isle. The tube I bought was less that $2 and u use very little.
*Thread or Wire-if using thread get a matching color so it blends in.
*Hair Clip-Which ever style u prefer. U just need to be able to attached the bow to it.
*Glue gun & glue (optional)-if u want to use the glue to apply the bow to the clip.

Wrap your ribbon around the dowel placing a clothes pin down to hold the ribbon in place.

Space your ribbon a little bit, make sure u don't overlap it. The tighter u make the ribbon the curlier it will be. Continue wrapping until u reach the end cut the ribbon and place the other clothes pin at that end to hold it in place.

Your oven needs to be clean especially the top! If its not, it can mess up the ribbon. Place Reynolds wrap on the rack and place rack in the middle of the oven.
Pre-heat oven to 250 Degrees. Stay by your oven while u do this to make sure your ribbon doesn't burn.
Put them in for 15 mins take it out and test. Test by removing a clothes pin and uncurl to see if its got the curl u want. If not, put it back in the oven for 10-15 mins check again.
I am doing mine at 250 degrees for 25-30 minutes.
Remove from oven. Let it cool down so u don't burn yourself.
Remove your ribbon from the dowel
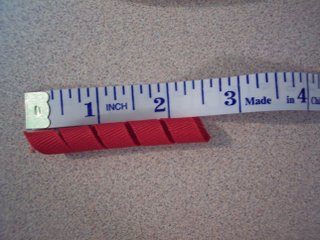
Cut your ribbon down to 2.5 cm to 3 cm. Apply Frey Check to the ends! Make sure u do that otherwise it will Frey!
Remove your ribbon from the dowel

Cut your ribbon down to 2.5 cm to 3 cm. Apply Frey Check to the ends! Make sure u do that otherwise it will Frey!

At this point u should have all your ribbon cut and frey check applied.
Stack up your ribbons and wrap thread or use wire. Thread can be a pain to use since u want to pull it tight. Make a knot then a double knot, u want to make sure it's tight.
I used "white" thread so u can see what I did.

Ta'da'...in this pic I have 24, 2.5 cm korker ribbons.
Now all u need to do is apply to a hair clip of your linking. Either use the thread, it will work well if u are tying it to a small clip. Wire or hot glue will work for the larger clips.
Any Questions?
Let me know how your bows turn out!! Can't wait to see them!!


96 comments:
that looks like a great tutorial, very explanitory. i understood it and the pics are great. hopefully we are gonna try to make some this week as soon as we get our items.
Manda, U are crazy! How is your crocheting going?
yay, we finished our first one!
hi, how do i make the snowman craft you did back in 2005? they are sooo cute!
thanks, christybuettner@hotmail.com
I actually bought those in a crafting kit at Walmart. If u have a good craft store u can get those supplies from there. They really are cute on the tree.
The bottom piece is cardboard, then brown thin foam,(the paperkind)two big white beads one had the face painted( u can do that yourself with paint and a toothpick) on it. The scarf is a pipe cleaner. The arms are like a brown wire so u can curl up the hands a little. A black top hat two bead one will need to be flat. It's a pipecleaner for the inner part of the body. It's all but together with superglue..but u can use hot glue.
Hope that helps hollar if u have any questions if u plan on doing it.
www.marymaxim.com has some cute kits for Christmas.
They have a really cute Silver Bell that is make outta safety pins and silverballs
Thank you for the instructions. I am looking forward to making korker bows for my daughter and her friends. I will be more than happy to e-mail pictures as well.
Thanks again!
I'm glad you showed a picture of the ruler, because I would have had VERY short corkers if I had measured out CENTIMETERS. I think you meant INCHES! Very cute, My girls love these!!
oopps, sorry it's supposed to be INCHES!
Wow! Thank you so much for all the great information! You ROCK!
thanks so much for this info!!!!!
Thank you SOOOOO SOOOO much! I greatly appreciate your tutorial -I have been wanting to learn how to make these bows for my little girl!!! These directions are perfect!! :)
Thanks again!! :)
Wonderful tutorial! Thank you so much! I just made two sets of beautiful bows for my daughter and I can't wait to experiment with more! Thanks again!
this is the best thing since sliced bread!!!!!!! you are the best.
from someone who will now have a perfectly accessorized daughter.
thanks so much
I also found more great hair bow instructions online at http://www.sweetbabybowtique.com
Why buy instructions tho when people on the net are offering instructions FREE!! Someone is always out to make a buck!!
I just found your website, and you rock! I love the corker hairbows, but can't afford to spend that kind of money. I love that you're willing to share your creative ideas free of charge! Again, thanks. I'm inspired.
~graciesmom
thank you so much for your tutorial...it was very easy to understand...i didn't have any dowel rods so i just used pencils and they came out perfect!!Thanks so much for taking the time to post this !!
Hi! Thanks for taking the time to post this...my bows came out great. I used 3/8" ribbon and 3/16" dowels for a smaller look. I do have a question though...have you tried this with polka dotted ribbon? Do the dots melt?
To the person who posted before me, the dots don't melt, I tried one done with flowers the same way the polka dots are and it makes for a stiffer ribbon but doesn't melt, its really nice.
I did have a question though, do you ever do bows with multiple colored ribbons. Your directions are the best, I was just trying with a few different colors together and can't seem to get them spaced out right to save my life and was wondering if you had any tips since your other directions were so good. Thanks.
Hi, I'm the one who posted before...about the polka dots. I did it with three different colors of ribbon and it looks great. I tried at first to space it out but it just gets all mixed up anyway...I just made sure that I had an even number of each color. I also put them on snap clips right at the end and they look great on my 9 month old daughter!
If you are looking for a cheap ribbon source, check out www.bellajoys.com! :)
~A Navy Wife in Monterey
Hi! Thanks for posting this. The directions were easy to follow and I made my daughter a cuter white and pink polka dot hairbow. And it was so easy!
Amber from Huntsville, AL
THis is awesome!!!! Thanks!!!
Thank you so much! I had been looking forever on how to make these. THANK YOU!!!!!
Thanks for the great tutorial. I made very colorful bows for my month old with velcro attached to match every outfit she has. I then purchased stretch lace and made headbands for her with a small piece of very soft velcro sewed on so the bows are detachable and the lace bands can be made bigger as her head grows.
Thanks,
Vanessa
Roscoe Illinois
Thank you, Thank you, Thank you! I've been trying to figure out these bows for a while and you gave the best directions. The photos helped tremendously.
Thanks again!
You are such a life saver. I have looked all over the internet and everyone wanted to charge for instructions on how to make the korker hairbows. Your instructions are great.
Love your sight but what kind of wire would I use if not useing string?
These are beautiful I can't wait to make them!!! what kind of ribbon do you use (grosgrain) and also what size?
Melissa
Thank you so much for these great instructions! I've already made my daughter 2 korkers. I thought it was ridiculous to consider paying for instructions, so I'm so glad I found your site. I'm also trying to make looped hairbows. Do you know how to make the rosette knot for the center? Like in this bow: http://lov.li/products/825561 Thanks!
I was am Army wife for 15 years, my x hubby was in the First Gulf War, I remember how hard that was for me and my kids, I can't imagine what Millatary families are going threw now...I think about all of you often, I watch CNN and I pray that this war ends soon I hope your hubby does not have to do another tour, I pray nobody does...
Gods Speed To all of you....
Used To Be An Army Wife
I did several for my daughter -- they turned out great -- thank you for the site!!
thank you for such thorough instructions, the pictures were a lifesaver! i cant wait to get started as soon as i get together all the supplies.
and thank you to the commentor about the pencils!
Thank you so much for the info. It's nice of you to let all of us know without trying to make a buck!! Good luck to you and yours. All of our family's support to you and your Hubby!! I can't imagine the sacrifices that you all make for our freedom! Your the best!!!
THANK YOU!!! This is amazing...I will tell my friends, and send a pic as soon as I try this! =o) Thanks for generously sharing!
I just wanted to let you know, that my 7 yr old decided to make a korker bow as her 4-H cloverbud county fair project (with a little help from mom) But it turned out cute she is very proud of it, and we used your tutorial...turned out very cute coming from a 7 yr old, i would post a photo if i could. Thank you so very much!!!!!
BLESS YOU! So many people just want to make money off of this.. I have two little girls who love 'pretties' in their hair and I cannot afford the eBay prices.. Now I can make my own for a fraction of the price! Thank you SO much!!
I know of 3 other websites that have some other types of bows (totally free!!)
bowdesigns.50webs.com
theribbonretreat.com
bowbusiness.com
first of all, thank you for the sacrifices that you, your daughters, and husband have made in order to keep my family safe. and second.......awesome tutorial!!!! your instructions were detailed, loved the pictures, and it felt like a personal friend passing down the wisdom. thank you!
Awesome directions - already tried them and they worked great! Thanks so much!
Thank you so very much! I am a single mom to 5 and volunteered to make hair bows for DD cheerleading squad, but cannot afford to go buy directions, so THANK YOU from the bottom of my heart! YOu are a great teacher! LOVE the clear pics and step by step directions. My girls are going to love the bows I will make for them! I pray for peace , supporting the troops, just not the war....Sam
I would also like to thank you and your family for your huge sacrifice. I stand in awe of what you are doing.
Posting this site at no charge shows you are also a christian Army wife.
Thank you for the detailed instructions. Once I clean my oven (heavy sigh), I will make some bows.
Take Care!
Thanks, hands downs the best tutorial for Korker bows.
Andrea
P.S. Googled "How to make a Korker bow" you are the second link.
Excellent tutorial!! Here are my baking instructions, in case you want to do it in a shorter amount of time:
Place dowel in oven and bake at 300 degrees for 15 min. for solid colors only. I do polka dots/stripes at 275 degrees. DO NOT PREHEAT OVEN. Bake for 15 minutes and let cool. (If baking more than 20 dowels at a time, then preheat oven.) DO NOT WALK AWAY FROM OVEN WHILE BAKING!!!
Kristi
Thanks for the info! Your instructions are so much more clear than the other sites I visited! The pictures really helped. I can hardly wait to try it!
BTW, congrats on the new addition!
Julie D
HELLO AND THANKS FOR THE INSTRUCTIONS. I AM GOING TO ATTEMPT TO MAKE A FEW IN A DAY OR SO. LOVE THE MUSIC!!! GREAT WEBSITE!
thanks so much! This was awesome. Best instructions i have read on this subject. I am putting my finished bow on my website oklahomalarsen.blogspot.com. I was so happy to find your directions!! Thanks!
What an awesome job you did. Your instructions were so detailed and have helped me. The illustrated pictures that you provided were very handy. Thank you for the help.
SAHM JERSEY
Thanks so much for your great instructions. I appreciate your tutorial so much. I am a stay at home mom and love these little project for my princess. I'm just wondering, some people say to use a starch, either liquid or spray on the ribbon. Have you done that before and do you find that it helps hold the curl longer?
Mom from Idaho :D
Thanks for the site. Yours had the best pictures and easiest directions. Not to mention the great music. Thanks again and God bless your family.
Thanks so much! I have been buying some off of Ebay, and the shipping is outrageous!
I can't wait to try it myself!
Great directions!!
Thanks so much for the great instructions! It works great!! Love it! Been looking for a good tutorial!! ~Mom of 2 girls
Thank you so much for the information. You are the first person that would actually tell me how to make my own and not try and sell me bows! Your awsome!
Thank you so much for taking the time to show us how to make these bows. I have been really wanting to learn. I am hoping this may bring in some much needed money to the family so I can continue to stay home with my precious little baby girl! Again, Thank you so much!
Thanks so much! That was awesome! I do not make hair bows to sell but make them as a hobby for my girls. I also found some excellent bow instructions at www.sweetbabybowtique.com
Thanks again for your instructions!
Tammy
Thanks for the information. I think it's great to know how they are made.
Thanks so much for posting this instruction guide, its way easier than any other steps. Im not very creative and I did not think it was going to come out good at all. I have to tell you I am very proud of myself they came out so CUTE! I have you to thank for that! Thanks again!
Thanks alot.. U made it seem so easy.. I have read other instructions and i was so lost.. again thanks so much!!!
THANKS SOOOO MUCH!!!!! Great job explaining it!!! I'm linking your page on my blog (both for future reference and for other people to click over) Thanks again!
I found you on Google, as well. Your instructions are phenomenal....I made a pink and brown bow to go with my daughter's dedication dress and now I can't wait to make more! The only problem I have is how to keep the korkers from scattering when I try to tie them in the middle. Ideas?
Thanks and God bless!
Amanda
Mascoutah, IL
I have been wanting to try this for sometime. Thanks for the info. I was a Army wife for 10 years. We are out now and Hubby has DOD job. I stay home with the kids and would go crazy with out crafts to do.
Thanks alot,
Chelle
Chellshock@hotmail.com
WONDERFUL.....VERY INFORMATIVE THANK YOU
Excelent instructions. Thanks so much!
THANK YOU SO MUCH!!! I am so excited about making these bows for my daughter!!! Thanks for your step by step directions.
Finally! I've loved these bows forever but couldn't bear to spend enough money for both of my girls to have a bunch. We just finished making each girl three sets and are heading out to buy more ribbons! Thanks so much!!! My princess' love them!
Me and You are like BFF now, lol, Thanks, I have been wanting to do these for awhile, I also live here in NC, Hampstead area, My hubby was in USMC in J-ville, Thank your hubby for our Freedom and you deserve a Medal for your commitment here in USA, Thanks..
Thanks so much for this great tutorial!! I am crafty, but had thought this was beyond me; it looks SOO easy!! Now I can M2M corkers for some of our old Gymboree I didn't buy accessories for. Thanks again!!
Well I love your tutorial as well. I am an Air Force Wife, and love to have matching bows for my little girl, but think its outrageous to spend all that money on them--this way I can get exactly what I want--and I am proud of them too! I am going to try to post my pics...so here we go...I have a question too though-can I use any other kind of ribbon than grosgrain? Im finding limited supplies on grosgrain, but I want to make more bows. Also, Will korkers work with the larger ribbon like 7/8"?
Hmm..I tried to post pics, but I cant figure out how?
>hi,somebody know where find grossgrain ribbon size 1/4 with dots or other like use Gymboriee in their korker bows?
tnanks
where I can find grosgrain ribbon size 1/4 with dots
where I can find grosgrain ribbon size 1/4 with dots
Thank you so much for this tutorial! I found one on another site and it wasn't nearly as explanatory as yours! I actually bought some pre-curled korker ribbon so I am going to be able to skip down and make the bow part but at least now I know how to make the ribbon "kork" now!
I was having problems getting the start of the ribbon around the dowel, is it ok to overlap? also can you use the dowels over and over?
I tried 100% polyester ribbon 1/4 inch baked at 275 Degrees for 20 min. And they are floppy looking I tried putting them together to make a bow it looks bad. Any suggestions? Thanks again for these awesome directions!!!
I used 10% polyester ribbon I baked it for 20 min at 275 and they look floppy. I try to make bows but they look awful any suggestions?
thanks for the tips. do you have any more bow ideas?
This is an awesome tutorial! I am going to try this. Thanks for posting such great pics with it.
This is awesome. Thank you for the instructions. They are so easy to follow. I do have a question. You said to use 100% polyester-grosgrain ribbon, but is 100% archival ribbon the same thing? or will it also work?
Thanks so much for these instructions. My daughter and I just made our first one and she is very excited to wear it to school tomorrow!
I can't wait to make these for my girls soccer team...Thanks for the great directions!
From another SAHM
how many yards of grosgrain ribbon do you need for 24 cuts for a korker?
I cant wait to try it!
Thank for that, Ive been searching EVERYWHERE to find out how to make them!! Thanks again!!
Great job! These are some of my favorite bows to make. I found my instructions at http://www.LearnHowToMakeBows.com
Thanks!
Kim
WOW!!! i didnt realize they were that easy i have been wanting to make them i have started a lil business makeing bows....but ive never heard of that frey stuff and i didnt understand do you put it all over or just at the end or waht....maybe i over looked it but plz help!!!
Fantastic! Very impressive. BTW, I came over via http://www.ourlilkilowatts.com/
If you don't have dowels, bamboo knitting needles work just as well. I have a complete set and the different sizes make different sizes of curls.
Great tutorial! Check out my bow, thanks to your help! (Linked back to you from my blog)
http://ksvincentfamily.blogspot.com/2009/06/create-something-new-hair-bow.html
Thanks for these instructions! I made my lil girl some of these bows and they are Sooooo Cute!! Always wondered how they were made!
Thanks for these instructions! I made my lil girl some of these bows and they are Sooooo Cute!! Always wondered how they were made!
Thank you for the instructions. I made my grand-daughter some pink ones, they are so cute.
loved this! such a great help, thank you. I have been trying my hand at this for a whole day, watching other tutorials that were complicated or unable to view. This will be a homeschool "favorite" for art!
I hope it is okay that I linked your post on my blog. These are beautiful.
I have 3 girls & one niece. I just started making bows for them & friends. I'm so excited to try this!
I have 3 girls & one niece. I just started making bows for them & friends. I'm so excited to try this!
Just wanted to give you a helpful tip. Before you put them in the oven you can briefly run them under running water. Not to soak them but to make them damp. They hold the curl so much better! Hope this helps. Have a blessed day!
Post a Comment